Monday 8 February 2016

How to Unlock Other Stubborn Modems/WiFi Routers like E303

Today, we will be solving the problem of unlocking Stubborn Huawei USB Modems and WiFi Routers like E5372, E303, Newer Version of E173 etc. Huawei E5372 Spectranet Nigeria 4G LTE WiFi Router is our case study. After most of the research, I have discovered a very simple way to unlock Newer Version of Branded Modems and WiFi Routers. Now let's get to business!

The method involved buy some credit from DC Unlocker. Unlocking it isn’t hard, so far you know the right steps to follow, but you must have a means of making payment in foreign currency like PayPal, Payza, WebMoney or Bitcoin account to get this done.

Nigeria Viewers
Nigeria have stopped using naira-denominated ATM cards for buying products from foreign e-commerce sites, which means you might not be able to use your linked Nigeria PayPal account to transact for now, but note that if your PayPal account was linked with your GTBank ATM card, you can still use it to transact on foreign websites, like using it to buy DC-Unlocker Credits via PayPal, but I used my Payza account to buy DC-Unlocker 7 Credits for unlocking Huawei E5372 Spectranet Nigeria 4G LTE WiFi Router.

How to Purchase Credits from DC Unlocker
Before buying any credit, you should first know the exact amount of credit needed to unlock your device. For Huawei E5372, it is 7 credits though it varies for different devices. You can check how much credit is needed for unlock your device here.
» To purchase credits, go to this page
» Select payment method, then fill the form correctly with the amount of credit you need.

» Currently, DC-Unlocker are selling one credit for one Euro. So, I bought 7 credits with $7.81 USD when converted by Payza. Hit the Buy Now button on the next page.
» Log in to your Payza account or any other account you wished to use for the payment, make the transaction and when you get redirected to DC Unlocker website, the displayed page shows your chosen username and your given password. Be sure to copy this to a notepad and save right away.
 
How to Unlock Your Huawei E5372 WiFi Router
» Download the latest version of DC-Unlocker client here and it is a .zip file, just extract it to your Desktop.
» Before you plug in your modem or router to the PC, insert a sim card. Usually a different sim from the Network Provider. (Eg. The network provider of the router I wished to unlock is Spectranet and I inserted MTN sim. I saw SIM Lock on the screen of my device)

» Now connect your Huawei E5372 Spectranet Nigeria 4G LTE WiFi Router Gateway to PC using USB cable as if you want to plug it for charging.
» Launch DC-Unlocker client and select your device model from the drop-down menu and then click on the magnifying glass icon to allow the program detect your device.
» Open Server tab, enter your username and password that you received after credits purchase. Click "Check login". Note that internet connection is required to verify your username and password and it is better for you to connect through Wireless, to avoid plugin two modem/router at a time via USB Port, you can share your smartphone internet with it.
Also Note: If you can't login or get error connecting to server after connecting Huawei E5372t to PC, check these settings here

» With that in place, Open Unlocking tab, and simply hit the “Do job” button.
» As you can see from the above screenshot, the Router was unlocked successfully!
You can now use any SIM on your Huawei E5372 WiFi Router. You can as well use this method to unlock any other stubborn modem or WiFi Routers so far it’s supported by the unlocker. If you’re using a ZTE modem, you can unlock the modem for free if you check this post.

- SHELAF

Wednesday 27 January 2016

How To Get Hibernate Option In Windows 8 And 8.1

As we all know alot of features changed (removed or added) in Windows 8/8.1 as compared to the previous version Windows 7. As for example just Start Menu is removed and Start Screen is added in windows 8. Windows 8 is a newer version of windows 7 but Couple of things have disappeared from Windows 8. Like start button, Microsoft also disabled Hibernate Option in Windows 8 and probably this is because Windows 8 Boots up and Shuts down faster than the all older versions. That is why i have created this topic because if you wish you can easily Enable Hibernate Option in Windows 8 in just 2 minutes.
What is Hibernate Option?
If you are unaware of Hibernate feature then before you enabling it, let us read about what the hibernate option is and what it can do? Hibernation is powering down a computer while retaining its state specially designed for laptops. While sleep puts your work and settings in memory and draws a small amount of power, it saves the contents of its Random Access Memory (RAM) or Open documents and other programs on your hard disk or other non-volatile storage. So you can enable this feature using following steps.
In this tutorial you do not need to add or remove any feature for Getting Hibernate Option. However, Hibernate Option are hidden in windows 8 but by following the steps below you can easily unhide and enable it.

Step-By-Step Procedures To Enable Hibernate Option/Mode:

  • At first press Windows Key and W on your keyboard (i.e. Win + W) to open search menu and then typePower Option and click on it.
  • Now from the left, click on Choose What the Power Button do.
  • Now on the next screen, you need to click on Change Settings that are currently Unavailable.
  • On the next screen Scroll Down, under Shutdown Setting, you will able to see Hibernate option. Tick theHibernate box to Enable it.
  • Finally, click on Save Changes.
  • You're done. Now whenever you want to use Hibernate Button, just Show up Charm Screen by moving your mouse pointer to right corner on your computer screen and click on Power Button. You will see Hibernate Option just like in the picture shown below.

As I already said for enabling or disabling Hibernate Power Option you do not need to Remove, Add or Modify any programs on your windows PC. So, this was the simple tutorials for Unhiding and thus Enabling Hibernate feature in just 2 minutes. Hope you liked it. Share your ideas/feedback/suggestion in the comments box. Stay tuned and Enjoy!!!...

SOURCE

How To Repair Damaged or Corrupted SD Card and Flash Drive


If you have a corrupt or damaged memory which you tried to format and it keeps replying you with WINDOWS CAN’T FORMAT DISK  and you wish to repair it, kindly follow the following steps:-
Insert the corrupted memory card into a card reader, and then connect the card reader to the computer.
Procedures:
  • Open RUN on your computer (to open RUN click on the “start” icon and enter “search for program” then type in RUN or press ctrl-R on desktop
  • After opening RUN type in “CMD” in the provided text box.
  • After that, type in “DISKPART”.
  • Type in “LIST DISK”.
  • Type in “SELECT DISK 1”.
  • Type in “CLEAN”.
  • Type in “CREATE PARTITION PRIMARY”.
  • Type in “ACTIVE”.
  • Type in “SELECT PARTITION 1”.
  • Lastly type in “FORMAT FS=FAT32”.
NOTE:  You should wait for 30 - 45 Minutes for it to Finish loading 1 -100%

After finishing this process remove your card reader from the computer USB port and also remove the SD card from the card reader……..that’s all.

Thursday 14 January 2016

How To Fix Blue Screen Of Death & System Auto Restart Issue


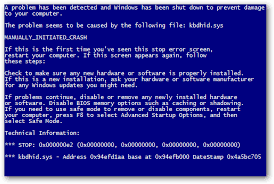
Blue Screen of Death, otherwise known as BSOD, STOP or blue screen, is a common error that happens once or twice in the life of every computer. This error comes in many forms; sometimes, it just comes up and hangs your PC. At other times, it simply restarts your PC immediately, after displaying the blue screen error.


What causes BSOD?

BSOD is usually caused by recently installed programs or viruses, that tamper with the Windows Essential Files, modifying them and thereby making them unsable by Windows. This results in the BSOD. This can be really frustrating, especially if you are working on a very important project on your PC. This guide will show you how to fix the BSOD in just some simple steps.


How do I fix BSOD?

Depending on the kind of BSOD error, it can sometimes take hours to fix. The first step you should take is by asking yourself what you just did on your PC, which resulted in the BSOD. Think very deeply. Oh yeah! You remember now? Recall yourself clicking the left button on your mouse like crazy just to download that amazing game. And after you downloaded and installed, what happened next? BSOD!!!


Easiest Methods to Resolve BSOD 

- Uninstall any newly installed program(s)

- Boot your PC using Last Known Good Configuration (while system is booting keeping pressing the F8 button to to undo recent registry and driver changes.

- Use System Restore to undo recent system changes.

- Roll Back device driver to previous version prior to your driver update.


After trying all the above and they don't fix your BSOD error, do not panic. Hope is not lost.


Final Solution

- Download this program: Blue Screen of Death Fixer - http://www.datafilehost.com/d/74dcf5ba

- Run Installer

- After Installation, run the program.

- Click on SCAN and allow the program to find all BSOD errors.

Now, click REPAIR button and patiently wait for the program to do it's job.


After that, restart your PC and your BSOD error is gone!

Tuesday 5 January 2016

7 Android ES File Explorer Features You Never Knew

It is no longer a rumor but a fact that ES File Explorer has proven itself worthy to be called the best file managing app for Android. However, ES File Explorer comes with some cool features which makes it stand out among other file managing applications.

Do you wish to protect your files? Do you wish to rename a group of files in a single tap? Do you wish to recover your deleted files easily? These and other wishes of yours will be granted today as I am with 7 Magic Wand to grant your wishes (#wink).

Below are 7 features of ES File Explorer, you ought to know:

1. Encryption/Decryption of Files 
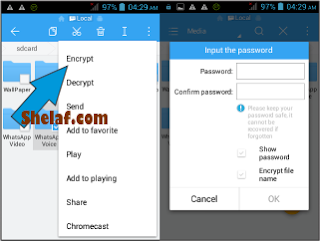
ES File Explorer provides you with an option to add a password (encryption) to your file(s) so that it becomes un-accessible unless the password protection is being disabled.
To use this feature, locate the file you wish to encrypt, tap and hold on it for about 3seconds, tap the drop-down menu button on the upper right corner of your screen and select ‘Encrypt’ then set your desired password.

To decrypt, simply follow the same process explained above but select ‘Decrypt’ in the drop-down menu this time.

2. File Compression/Extraction
With EX File Explorer, you can easily compress your files into ‘.zip’ ‘.tz’ or ‘.gz’ archives so as to make your files less scattered and easy to transfer. You can also extract archives easily with ES File Explorer without necessarily downloading any separate application.
To compress a file, locate the file/folder destination, mark your desired files, select compress, choose a name for the archive, add a password if you wish then select ‘OK

3. File Invisibility by Renaming
With ES File Explorer, you can easily rename a folder to make it hidden by adding a dot (.) before the folder name.
To do this, locate the folder you wish to hide, tap and hold on to the folder for about 3secs, tap the option button close to the drop-down menu button on the upper right corner of your device’s screen, add a dot (.) sign before the folder name then select ‘OK’. Now, when one tries to access the folder via your phone’s file manager, it won’t be visible unless the process is being reversed by removing the (.) sign.

4. Battery Optimization 
This feature is one of the unknown but key features of ES File Explorer. Aside the app’s ability to properly manage files, ES File Explorer provides an in-built memory cleaning tool which helps in cleaning your phone’s memory by clearing some background apps/files draining your battery.
To use this feature, on the main page (the page that shows up when you open the application), drag your thumb from the left corner of your screen to the right corner to view the hidden option menu. On the menu, select ‘Cleaner’ then tap ‘Clean Now’.

5. Temporal Delete of Files
With ES File Explorer, You can easily delete a file temporarily by adding it to a Recycle Bin present in the app. These deleted files can easily be recovered later on from the Recycle Bin. To move files to a recycle bin, drag your thumb from left to right over your screen, then enable the recycle bin feature by tapping sliding button beside it.

After enabling it, try deleting a file and you will be asked if you want to move the file to recycle bin, select ‘OK’ and your files will be temporarily deleted.
To restore the deleted file(s), return back to the option menu, tap ‘Recycle Bin’ then restore the file you desire.

6. Renaming Files in Batch
With ES File Explorer, you can easily rename a group of files in a single click. 
To do this, mark the files you wish to rename, tap the rename button on the upper right corner of your screen then input a file name.

7. SD Card Analysis
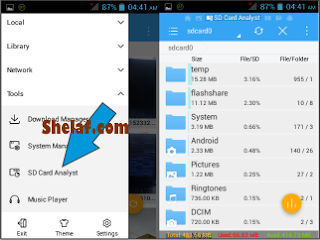
ES File Explorer, you can easily analyze/monitor your SD card storage where you can see the size of each folders/files and also see the amount of free/used space available on your SD card. To do this, drag your thumb from the left side of your screen then select SD card analyst.

There you have it, 7 features of ES File Explorer you never knew of. Now you know, what’s next? Go ahead and take advantage of them! 

Saturday 28 November 2015

Easy Method to Root and Change IMEI of Infinix Hot2 (Android One)

Image result for Infinix Hot2

Some fans are asking me how simple of rooting and tweaking Imei of new Infinix Hot2 before they lay their hands on it. The Infinix Hot2 come with the latest Android version 5.1 Lollipop and other awesome specification, its price also affordable, simply click here to check out its full review.
The below tutorial will guide the Infinix Hot2 users to Root and change the Imei of their Smartphone easily in order to flex with Glo Bis, Etisalat Chat/Smartpak of N50MTN bblited of N70 etc. Also the rooting will make you enjoy your phone to the fullest. The method also works for other stubborn MTK devices that are difficult to change it's IMEI through MTK Engineering Mode.

Materials Needed For Rooting

  • KingRoot 4.1.0.249.apk [Download it here]
  • Strong Internet connection [Town ON your Data Connection is highly recommended]
To Root Your Infinix Hot2

1. Install and run Kingroot. Wait till it detect the phone


2. It will verify your root status >> Click on TRY TO ROOT

3. The rooting process should begin and you’ll see something like the image below

4. During the process, your device may restart, don’t let your mind's sake, your device is safe. As soon as your Infinix Hot2 reboots, the rooting process will continue automatically.
5. You may get a prompt to install an app. Ignore the warning, mark the check-box and tap “Install anyway”

6. After a minute or so, the rooting process should be completed!

It is simple as that. You may download Root Checker from Play Store to verify your root privileges. After downloading, simply Install Root Checker, run it and you should get a success message after then. 

To Change Your Infinix Hot2 IMEI


In this method, we are going to use an application called Chamelephon. It's simple and short for those who are new to this. Simply follow the steps carefully. No need of CDS information or engineering mode at all.

1. Download Chamelephon.apk here
2. Open Chamelephon and grant it super user permission
3. The first box is for the IMEI of the sim 1, if you are using a dual sim phone. And the second box for Sim 2.

4. Input the IMEI number you wish to change to in any of the boxes. You can simply leave any of the boxes you did not wish to change the IMEI empty.
5. Then click Apply New IMEIs.
6. A popup box will ask “Do you confirm changing the IMEIs?” Click on Change button.

7


Note that Changing of IMEI is illegal in some countries, and Shelaf will not be held responsible for any consequences that befall the changer.
Also, backup your original imei incase anything goes wrong, then revert using the above procedures for changing. 

How To Know If Your Android Phone Is Fake Or Original


Mobile Markets are filled with Fake Phones and they selling them as Original even with Branded tags beside it the replica phones are present in the market that looks similar to the original phone, to check whether your phone is original or fake there are two ways of checking it. These methods will help you a lot while buying a used cell phone.

1. First Check the following Features :

Be careful about the spellings For example, Soniericsson, Nokla, Techno and Samsvng
Warranties: Always insist on 12 months warranty certificate from the handset manufacturers; Never an oral agreement with the seller. Fake phones come with a shorter warranty periods since counterfeiters cannot guarantee it will last so long.

Check for performance of the handset: Some people carry their phones home without testing it first. Some dealers encourage this, knowing the handset is fake. As you check it out, you may notice some points of low performance such as memory which is smaller or poor quality photos.

Appearances: like dull colors , Fake logos,built quality difference in weight, screen size, location of buttons and battery, quality of printing and paint finish, added or missing functions, quality control stickers and holograms and an overall lack of quality.


2. The other method is checking Phones quality through 15 digit IMEI code:

Dial *#06#

IMEI stands for International Mobile Equipment Identity. It is a 15-digit number and may be found in the packet of the mobile phone. It may also be found by removing the back cover and it may be placed on the battery sticker.

The number might be as below:
3 6 9 3 9 5 [b]0 1 2 3 5 5 6 7 8[/b]
Now look at the 7th and 8th digit. These two digits will ensure your phone’s quality!

If the seventh and eighth digits are 00 this indicates your cell phone is manufactured in Original Factory which ensures the best quality.

If the seventh and eighth digits are 01 or 10 this indicates your cell phone is manufactured in Finland which is high quality.

If the seventh and eighth digits are 13 this indicates your cell phone is assembled in Azerbaijan which is too bad. And it is also dangerous for health!

If the seventh and eighth digits are 02 or 20 this indicates your cell phone is assembled in Emirates which is very poor quality.
(NB: Some Indian sets have this number)

If the seventh and eighth digits are either 03/30 04/40, this indicates your phone is made in China but its quality is good. But not good either as 00, 01 or 10.

If the seventh and eighth digits are 05 or 50 this indicates your cell phone is manufactured either in Brazil or USA or Finland.

If the seventh and eighth digits are 06 or 60 this indicates your cell phone is manufactured either in Hong Kong, or China or Mexico.

If the seventh and eighth digits are 08 or 80 this indicates your cell phone is manufactured in Germany which is fair quality.

This will help you to pick the good one. Try it. But, remember, these tips may not work with the Sony Erickson Mobile Phone.
Though the above information has been collected from very reliable sources, 1 or 2 of them may slightly vary.

Infinix Mobility Launches Infinix NOTE 2

Infinix Mobility, Nigeria’s fastest growing smartphone has announced thelaunch ofthe latest in its NOTE series, the Infinix NOTE 2. According toSeunAjiboye, E-Commerce Manager, Infinix Mobility, the InfinixNOTE 2 was introduced to raise the bar in smartphone brands in Nigerian market. 

Wednesday 25 November 2015

LG Introduces LG16- The Cheapest Android Ever, Sells For N2000 ($10)


most of you must have heard about the LG16 on walmart? if not read on.
Its true these LG devices Tracfone lucky LG16 and LG15G are being sold at $9.82 on walmart.

It seems android phones are becoming quite affordable these days. Don't get me wrong there are some expensive android phones out there but the particular one by LG will make your jaw drop.

Sunday 22 November 2015

Wednesday 7 October 2015

Leaked photo of New Blackberry Android powered Smart phone THE PRIV


Just a few weeks after BlackBerry CEO, John Chen, confirmed that the company will be launching an Androidpowered smartphone which will be known as the Priv, a new set of leaked images have confirmed some of the key specs of the device.The images confirm that the upcoming device will definitely be powered by an SoC (expected to be a Snapdragon 808) with a 64-bit processor.

Wednesday 30 September 2015

How to wipe data and factory reset your Android phone AFTER pattern lock or password is forgotten.


Android phone or tablets we use and some time we forget password or pattern lock and we unable to reset password via email id or password because net is disable and now we needs to perform a factory reset. It’s also known as Hard Reset.

Wednesday 16 September 2015

The Latest Tecno Phone... Tecno Phantom 5 Pics,Review And Full Specs


The tecno phantom 5,which was released yesterday is the latest phantom series from Africa's leading mobile phone manufacturer TECNO .its comes with full metallic bodyfeaturing 4g LTE connectivity.

View specifications below ....

Friday 14 August 2015

How To Repair Corrupted Hard Drive/memory Card

Ever had a memory card that was corrupted due to virus or improper ejection of the hard drive or memory card. Here’s how you can recover a corrupted memory card /hard drive :

-first insert the memory card or hard drive through the USB port and remove
All other drives if connected.
-now check the letter name of your memory card or hard drive it could be letter G, F or any other letter.

Monday 3 August 2015

How to measure your heart beat with any Android phone


it's something thats very practical, useful and easy to use.
Here's a little secret: You can actually check your pulse with anyAndroid phone. All you need is a camera phone that's got flash and the right app.
There are quite a few apps out there designed with your heart in mind. I've been trying out one of the more popular ones, Instant Heart Rate, and it's actually been quite accurate in my observations so far.